
Oct Spooky Tech: 10 Automated Halloween Props Powered by Raspberry Pi Pico & NeoPixels
3D Printing, Beginner, Home Automation, Intermediate, PiShop, Platforms, Projects, Raspberry Pi, Raspberry Pi Pico, Resources, Robotics, Skills, Tutorial 0
The best Halloween props don’t just sit there. They watch you, move when you get close, and scream at exactly the wrong moment. Makers around the world have been building exactly that with Raspberry Pi boards and the tiny Raspberry Pi Pico for years, and many of them have shared full build guides and code.
We’ve rounded up 10 of our favourite Raspberry Pi Halloween projects from around the internet, ordered roughly from easiest to most ambitious. Each one links to the original guide, so you can follow along step by step or borrow ideas for your own creation. Most use parts you can pick up at PiShop: a Pico or Raspberry Pi, a motion sensor, some LEDs or servos, and a bit of imagination.
1. Motion-triggered NeoPixel Pumpkin
If a project is simple enough for an 8-year-old, it’s a great place to start. PenguinTutor’s son built this jack-o’-lantern that lights up whenever someone comes near. A PIR motion sensor spots people entering the room, and a Raspberry Pi then lights up a sequence of NeoPixels inside the pumpkin.
The code uses the GPIO Zero library for the sensor, and the write-up shows how to change the colours, flashes and sequences. A small strip or ring of NeoPixels works as well as a long strip.
You’ll need: a Raspberry Pi, a PIR motion sensor, some NeoPixels such as the WS2812B RGB COB LED strip, and a simple voltage level shifter.
Get the guide: Motion Triggered Halloween Pumpkin on PenguinTutor
2. Living Portrait Scare
A classic haunted-house trick: a portrait on the wall that looks perfectly normal, until it doesn’t. This build uses a Raspberry Pi, a PIR motion sensor and Python to keep the portrait still until someone walks past, then plays the scare and resets.
The clever part is that the maker solved the usual problem with video props: there’s no blank screen between the still image, the scare and the reset, so the illusion never breaks. Hang an old monitor in a picture frame and you’re most of the way there.
You’ll need: a Raspberry Pi, a screen, and an HC-SR501 PIR motion sensor.
Get the guide: Living Portrait Scare on Instructables
3. DIY Haunted House with Raspberry Pi
Using a Raspberry Pi 4, some creative props and a little bit of coding magic NetworkChuck has created his own horrifyingly fantastical haunted house! Checkout his video below for some spooky inspiration or purely for some new ideas on how to use different components!
He’s video has been segmented perfectly in levels of horror that you can accomplish for if you just need a front door prop!
You’ll need: a Raspberry Pi, a screen, and an HC-SR501 PIR motion sensor, Speakers, Camera.
Get the guide: I Built a HAUNTED HOUSE with Raspberry Pi
4. Animated Halloween Skeleton
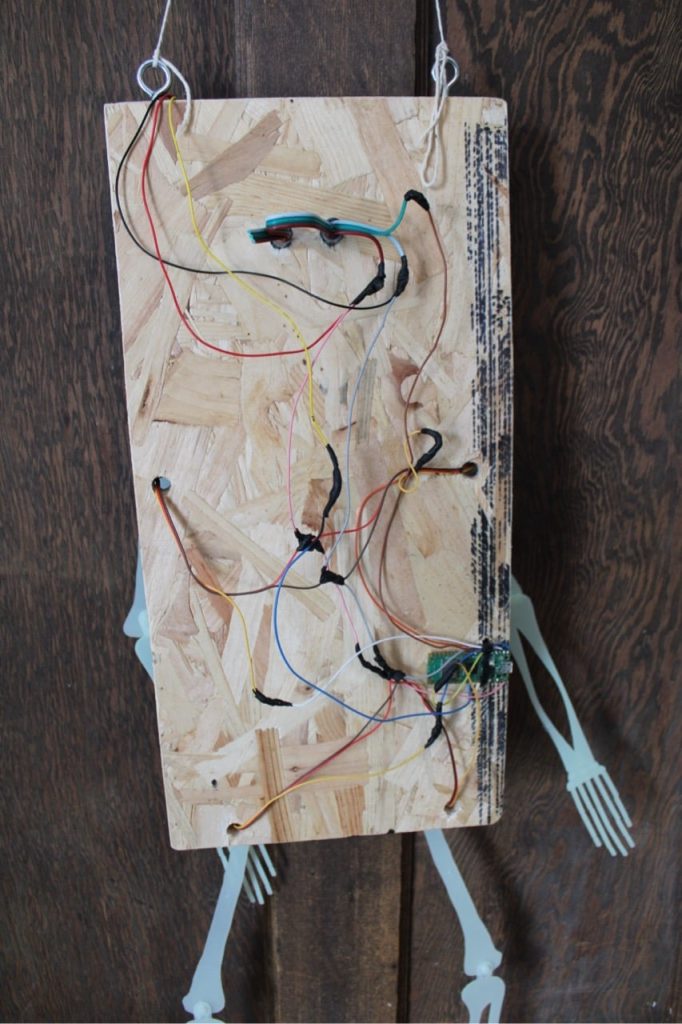
This one comes straight from the Raspberry Pi team. Taken from the Raspberry Pi Book of Making 2027, it brings a cheap 90 cm glow-in-the-dark skeleton to life with a Raspberry Pi Pico. Four small 9 g servos drive the hips and shoulders, while the knees and elbows flail around loose.
A Sharp distance sensor wakes the skeleton up only when someone gets close, rather than whenever anything moves. Two WS2811 RGB LEDs cut from a string give it glowing eyes, wired just like a NeoPixel strip. The whole thing is mounted on a painted board and runs from a single 2 A USB supply.
You’ll need: a Raspberry Pi Pico, four 9 g servos, a Sharp GP2Y0A02YK distance sensor (or something a bit more basic: Ultrasonic Sensor), two WS2811 LEDs and a 2D plastic skeleton.
Get the guide: Animate a Halloween skeleton on raspberrypi.com

5. Spooky Skeleton and Petrified Pumpkin Robots
Robotics YouTuber Kevin McAleer took Halloween in a funny direction: his 3D-printed skeleton and pumpkin are more scared of you than you are of them. A Raspberry Pi Pico reads a range finder, and when you get close, a servo raises the eyebrows and drops the jaw into a terrified expression.
The electronics are refreshingly simple, and Kevin has put all the files and code on his GitHub. It’s a great pick for families with younger kids who want the fun of Halloween without the nightmares.
You’ll need: a Raspberry Pi Pico, a servo, an ultrasonic range finder and access to a 3D printer.
Get the guide: Spooky skeleton and petrified pumpkin robots on raspberrypi.com
6. Animated Eyes for Props and Masks
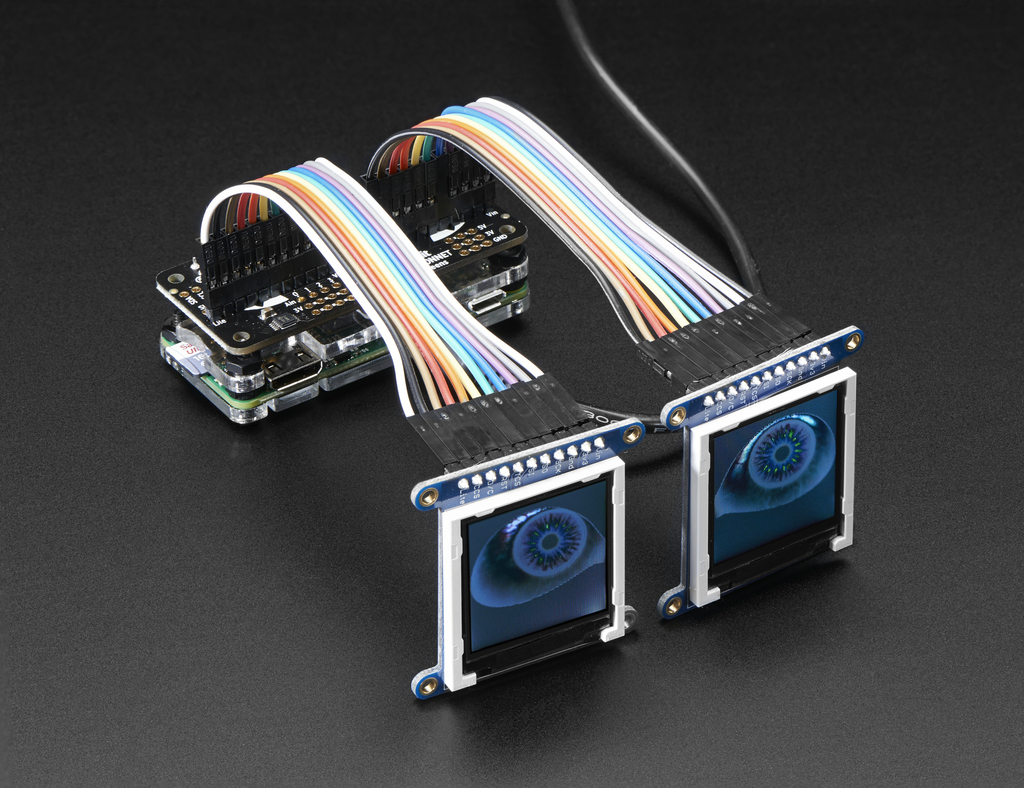
Nothing brings a prop to life like eyes that move. Adafruit’s Snake Eyes Bonnet plugs onto a Raspberry Pi and drives two small OLED or TFT displays with realistic, blinking animated eyes. It also has four analog inputs, so you can hook up sensors to make the eyes react.
Drop them into a skull, a pumpkin, a cosplay mask or a creepy doll and you’ve got an instant upgrade. Adafruit’s guide covers setup and the software, and notes that a Raspberry Pi 2 or newer gives the smoothest animation, with Pi 4 and Pi 5 now supported.
You’ll need: a Raspberry Pi, the Snake Eyes Bonnet and two small OLED or TFT displays.
Get the guide: Animated Snake Eyes Bonnet for Raspberry Pi on Adafruit Learn
7. Singing Projected Pumpkins
DIY Machines built a trio of 3D-printed pumpkins that sing, scare and tell stories. A Raspberry Pi plays animated faces through a cheap projector from inside the house, shining through the back of the translucent pumpkins in the window. Outside, visitors press one of three illuminated arcade buttons to choose a song, a scare or a story.
The smartest part of the design is that the projector and Pi stay safely indoors, away from rain and sticky fingers. Only the speaker and buttons sit outside, and everything uses removable connectors, so you can reuse the parts for Christmas.
You’ll need: a Raspberry Pi, a budget projector, a portable speaker, three illuminated arcade buttons and a 3D printer.
Get the guide: DIY Interactive Animated Pumpkins on Electromaker
8. Haunted Effects Door
Recreating the classic horror-movie moment when something tries to break in, Cabe’s Halloween door for element14 is a full haunted-house effect. A Raspberry Pi cycles through different banging sequences, with pistons smashing against the door so the knocking is never the same twice.
An LCD screen set into the door acts as a “window”, showing ghosts and monsters flying past. Combine the two and visitors get a different scare every time they walk up.
You’ll need: a Raspberry Pi, an Raspberry Pi, pneumatic pistons, and a sturdy door to mount it all on.
Find it: featured in element14’s Raspberry Pi Halloween projects
9. Remote-controlled Billy from Saw
Few props are as instantly creepy as Billy, the puppet on a tricycle from Saw. Maker david0429 built a version that actually drives around: a Raspberry Pi with an Adafruit Motor HAT controls a geared drive motor on the trike, and a speaker lets Billy talk.
The whole thing runs from portable USB power banks, so there are no trailing cables to give the game away. All the code and files are on GitHub, and the Instructable walks through the drive motor, body and head in 12 steps.
You’ll need: a Raspberry Pi, a motor HAT, a geared DC motor, a speaker, USB power banks and a child’s tricycle.
Get the guide: Remote Controlled Billy From Saw on Instructables
10. Networked Pico Haunted Display
For the ultimate challenge, Daniel Bloy of Code Club Adventures runs his whole annual Halloween display on a fleet of Raspberry Pi Picos. Each board handles one part of the scene, such as a path of glowing skulls, and they coordinate with each other over Wi-Fi.
He built an open-source CircuitPython framework to make it work, with ready-made support for NeoPixel animations, flickering effects, ultrasonic sensors, buttons and MP3 audio. You can use it for a single Pico project or grow it into a multi-board installation, year after year.
You’ll need: several Raspberry Pi Pico 2 W boards, NeoPixels, ultrasonic sensors and speakers.
Get the code: pico-interactive on GitHub
Conclusion
You don’t need to tackle a multi-board haunted display on day one. Pick a beginner project, get it working, then add a sensor, a servo or a speaker next year. Many of these builds share the same core ingredients, so every one you finish makes the next one easier.
PiShop stocks the essentials to get started, including Raspberry Pi and Pico boards, the HC-SR501 PIR motion sensor and the WS2812B RGB COB LED strip. Order early so your parts arrive in time for 31 October.
Built one of these? Tag us on social media with your spooky creation. We’d love to see what you make, and the scariest builds might just feature on our blog.