
How to Build a WiFi Alarm Clock with a Raspberry Pi Pico W
Beginner, Home Automation, PiShop, Platforms, Projects, Raspberry Pi Pico, Skills alarm clock, buzzer, getting started, i2c lcd, raspberry pi, raspberry pi pico, Tech 0
At PiShop we love building our own tech and absolutely love the rewarding experiences that you get as you traverse through the process of a project. Following the beginner friendly theme that we’ve been going with the last few weeks, today I’ve got an DIY alarm clock using a Raspberry Pi Pico W using a passive buzzer, some tactile buttons and an I2C LCD display. The end goal for this project is to create an alarm clock that syncs time automatically over wifi.
What you'll need
We’ll list the main components on this project as well as some basic, common components that you generally need for any project:
- Raspberry Pi Pico WH
- the brain of the project. Runs MicroPython and connects to WiFi to sync the time automatically via NTP
- IIC I2C 1602 LCD Display Module
- displays the current time on line 1 and the alarm status on line 2. Uses the I2C protocol so only two data wires are needed
- Passive Buzzer with Jumper Housing
- sounds the alarm. Unlike an active buzzer, a passive buzzer requires a PWM signal to produce a tone, giving you control over the frequency and beep pattern
- Tactile Push Buttons
- four buttons control the clock. Mode to enter the alarm menu, Up to toggle the alarm on or off, Down to decrease values, and OK to confirm or dismiss the alarm
- Breadboard
- Jumper Cables
Wiring It Up
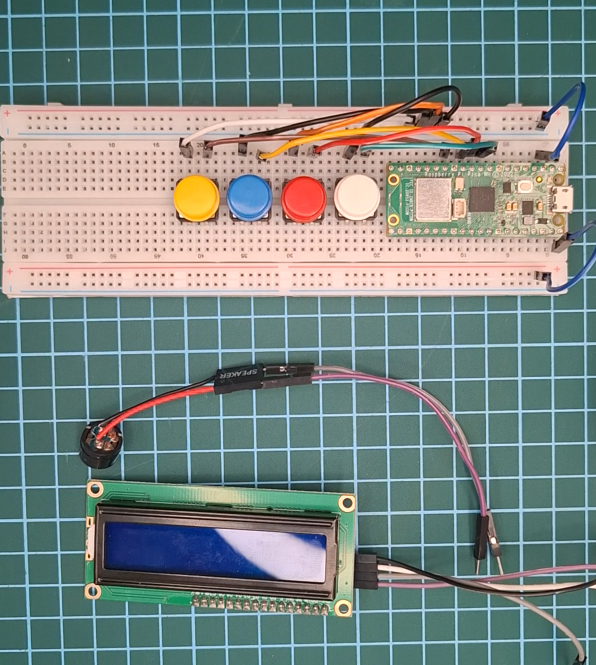
All the components in this project are connected to the Raspberry Pi Pico WH via the breadboard, as you can see in the image above, the VBUS pin and a GND pin are connected to the seperate lines on the breadboard for keeping stuff organized.
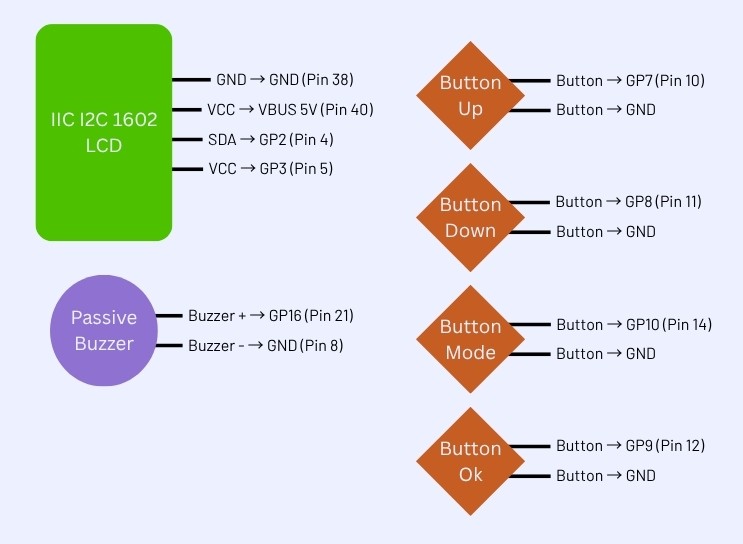
Components -> Pico W Pin
- LCD VCC→VBUS 5V (Pin 40)
- LCD GND→GND (Pin 38)
- LCD SDA→GP2 (Pin 4)
- LCD SCL→GP3 (Pin 5)
- Button Mode→GP10 (Pin 14) + GND
- Button Up→GP7 (Pin 10) + GND
- Button Down→GP8 (Pin 11) + GND
- Button OK→GP9 (Pin 12) + GND
- Buzzer +→GP16 (Pin 21)
- Buzzer −→GND
Libraries needed to get this going
Before we even begin any programming, we need to install some libraries to get the display working with the Pico. Download the following 2 files from the github link below:
- Go to github.com/T-622/RPI-PICO-I2C-LCD
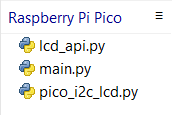
- Download lcd_api.py and pico_i2c_lcd.py
- Open each file in Thonny and save it to the Pico WH
The Code
We’ve created a Github account for our projects! You can find the Raspberry Pi Pico WH Alarm Clock project here”
WiFi-synced alarm clock built with a Raspberry Pi Pico W, I2C LCD display, passive buzzer, and tactile buttons. Written in MicroPython.
How to use your Alarm Clock
A clear, simple guide to using the finished clock:
- Setting the alarm – press Mode, use Up and Down to set the hour, press OK, then set the minutes and press OK again
- Toggling the alarm on or off – press Up on the main screen
- Dismissing the alarm – press OK when the buzzer is beeping
Conclusion
Building your own alarm clock from scratch is one of those projects that perfectly captures what maker culture is all about, taking a handful of components and some code and turning them into something genuinely useful.
What makes this project particularly rewarding is that it punches above its weight. On the surface it is a simple alarm clock, but underneath you are touching on real electronics concepts, I2C communication, PWM signal generation, WiFi networking, and NTP time synchronisation. Skills that transfer directly to countless other Pico W projects.
From here there is plenty of room to grow. Add a snooze function, display the date, set multiple alarms, or 3D print a custom enclosure. The foundation is solid, what you build on top of it is up to you.
All the components used in this build are available at PiShop.co.za. If you build your own version we would love to see it, tag us on social media and show us what you made.
Now go build something.


