How to Install and Use the DotClear Blogging Platform on Your Raspberry Pi
Blogging is a great hobby. At its most basic, it’s a form of online diary that you govern without the rules and strictures of microblogging platforms such as Facebook and Twitter.
When it comes to your blog, you are your own writer and editor; you own the story you share with the world. And with a solution like DotClear, you can easily create your blog and host it from your home on a Raspberry Pi. Here’s how:
What Is Dotclear and How Is It Different From Other Blogging Platforms?
Dotclear is a free and open source software that bills itself as “blog management made easy”; it predates the popular WordPress platform by one year—initially released in 2002.
The platform is unusual in the sense that a single installation supports multiple separate blogs and multiple users. Plus, it boasts built-in antispam mechanisms, a customizable layout, a fantastic comments system, and a plethora of themes and plug-ins to make your blog look more visually appealing as soon as you deploy it.
Dotclear’s open-source license means that as well as downloading, using, and modifying the software, you also have the freedom to redistribute the code and to contribute to the project’s future direction.
How to Install Dotclear on Your Raspberry Pi
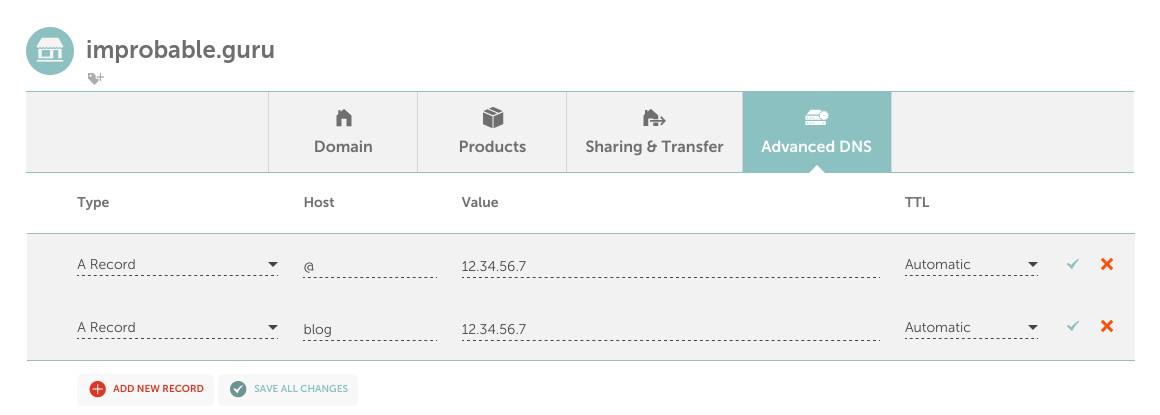
Before you start, you should follow our guide to preparing your Raspberry Pi as a server. Once you’ve finished, head over to your registrar’s Advanced DNS settings page.
Delete all records and create a new A record. Set the host to “@”, value to your public IP address, and the TTL as low as possible.
If you are going to access your Dotclear through a subdomain, for example, blog.improbable.guru, you will instead set the A record to “blog”.
With the preliminaries out of the way, log into your Raspberry Pi using Secure Shell (SSH), and make sure that all installed packages are up-to-date:
sudo apt update
sudo apt upgrade
Dotclear will require a database and database user in order to complete the installation. You should have already installed MariaDB, so enter it with the following command:
sudo mariadb
Now, add the following entries one line at a time:
CREATE DATABASE dotclear;
CREATE USER dotclear IDENTIFIED BY 'supertopsecretpassword';
GRANT USAGE ON *.* TO dotclear@localhost IDENTIFIED BY 'supertopsecretpassword';
GRANT ALL privileges ON dotclear.* TO dotclear@localhost;
FLUSH PRIVILEGES;
quit;
Change the directory and use nano to create a new Apache configuration file:
cd /etc/apache2/sites-available
sudo nano dotclear.conf
In the new file, set the domain name and the directory where you will store your blog’s files:
<VirtualHost *:80>
    ServerName blog.improbable.guru
    DocumentRoot /var/www/dotclear/
</VirtualHost>
Save the file, and exit nano with Ctrl + O followed by Ctrl + X.
Enable the new conf file and restart Apache:
sudo a2ensite dotclear.conf
sudo service apache2 restart
Create the directory you just specified, then move into it:
sudo mkdir /var/www/dotclear
cd /var/www/dotclear/
Now, download the automatic Dotclear installer:
sudo wget https://download.dotclear.org/loader/dotclear-loader.php
Use the following line of code to recursively change the ownership of your current directory so that Apache can write to it:
sudo chown -R www-data:www-data .
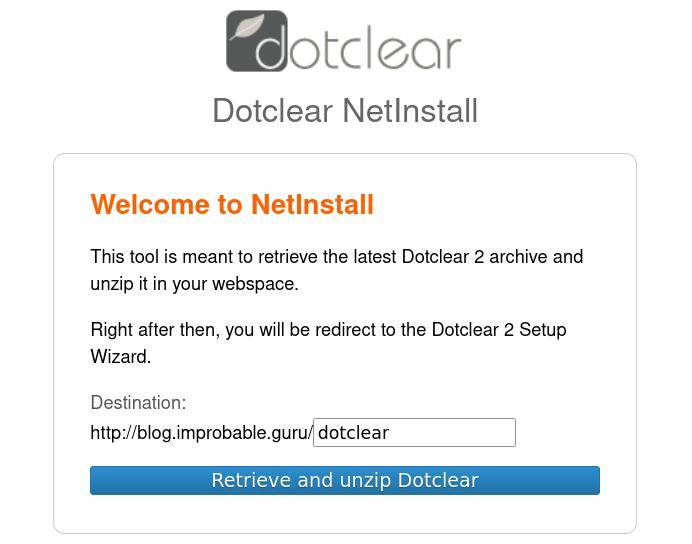
Now, open a browser and navigate to your-domain.tld/dotclear-loader.php. At this point, you will be using a non-secure HTTP connection. Don’t worry; you can and will change this later.
You will be greeted by the Dotclear NetInstall wizard, the job of which is to retrieve the latest Dotclear archive and unzip it in your web space.
By default, the destination is your-domain.tld/dotclear, but if you want the blog in the root of your domain or subdomain (you probably do), delete this field. Now click on the “Retrieve and Unzip Dotclear” button.
Fill in the database details. The database hostname is localhost, the database name and database username are both dotclear, and the password is the one you set earlier. You can set the database prefix to whatever suits you. This data will be committed to a configuration file. To view its contents, enter the following:
cat /var/www/dotclear/inc/config.php
On the next screen, you will be prompted to create a user account, and the wizard will ask you for your first name, last name, and email address—you can ignore these if you wish, but you will need to set a username and a password.
Read More: How to Install and Use the DotClear Blogging Platform on Your Raspberry Pi – MakeUseOf


