
Roll for Initiative: We Put Dice on a Microcontroller (and It Slaps)
Beginner, Intermediate, Other, PiShop, Platforms, Projects, Raspberry Pi Pico, Robotics, Skills dice, getting started, raspberry pi, raspberry pi pico, Tech, ttrpg 0
Every tabletop gamers has been there. The tension is thick in the air as you stretch over to grab the D20, you shake it around a bit before letting it go, it bounces once or twice and disappears over the edge of the table. We’ve all lost dice to the void beneath the table.
That’s why following our previous arcane projects article, we decided to create our very own digital dice roller! The reason being the aforementioned situation as well as for immersion into the sci-fi games that we tend to play quite a lot.
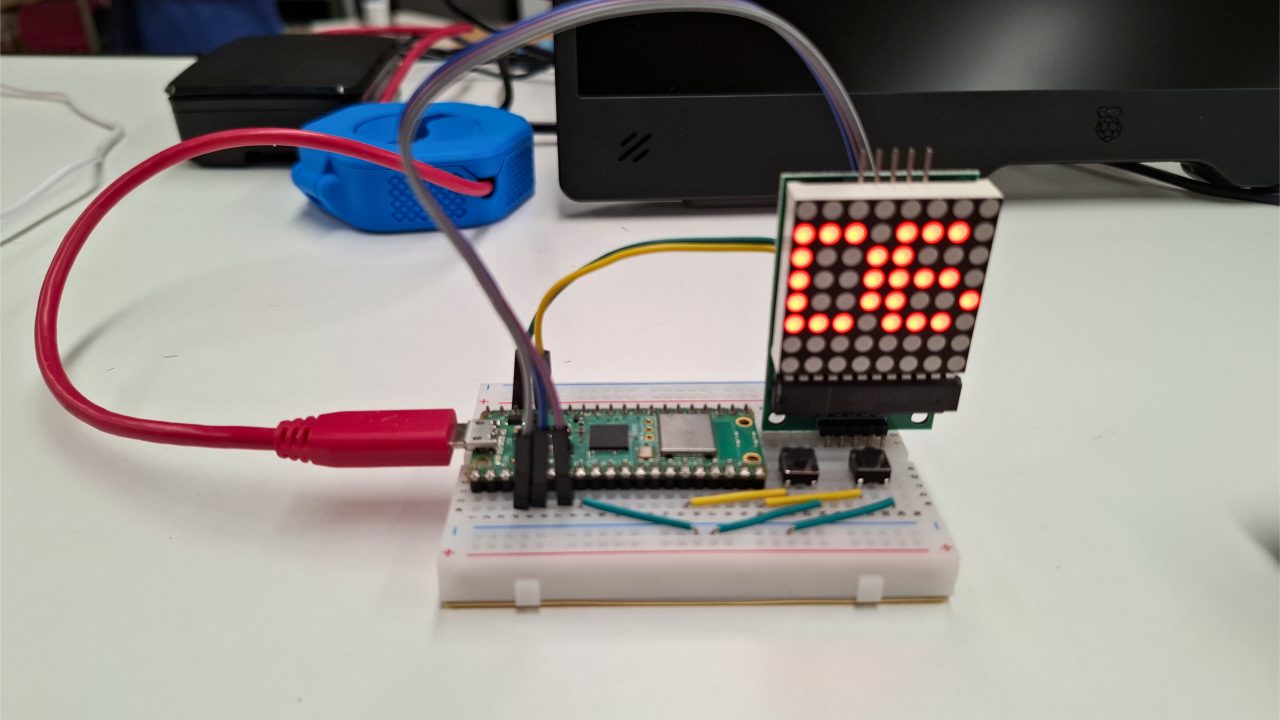
What we built is a digital dice roller based around a Raspberry Pi Pico and a MAX7219 8×8 LED Matrix. It has 2 buttons and six die types that you’re able to scroll through. It finds mildly in your hand but doesn’t roll under the couch and with a few more alternations could look fantastic on our gaming table.
What Does It Do And What'll It Need?
Keeping it true to form and as basic as possible we wanted to cover the six standard tabletop die types: D4, D6, D8, D10, and D20. Following that we need to keep the UI simple as we probably aren’t the only people that’ll be using this. The current selection will be displayed on the LED matrix as pixel-art.
- Button 1 will cycle through the die types.
- Button 2 will trigger the roll.
Results 1 through 20 each have their own handcrafted bitmap, a tiny number rendered in a pixel font inside a rounded dice border. It’s crisp, readable at arm’s length, and oddly satisfying to watch.
This is a beginner-to-intermediate build. The parts list is short and everything is breadboard-friendly:
Wiring It Up
The MAX7219 talks to the Pico over SPI. The buttons use the Pico’s built-in pull-up resistors, so no external resistors needed, just wire one leg to the GPIO pin and the other to GND.
Max7219 to Pico
VCC → 3V3
GND → GND
DIN → GP3 (SPI0 MOSI)
CLK → GP2 (SPI0 SCK)
CS → GP5 (any GPIO)
Buttons to Pico
Button 1 (cycle die): GP11 to GND
Button 2 (roll): GP15 to GND
One important note: mount the MAX7219 module with the connector on the left. The bitmaps in the code are pre-rotated 90° clockwise to account for this orientation, so the display reads upright without any extra fuss.
How The Code Works
The firmware is written in MicroPython and splits cleanly into three layers.
					"""
Dice Roller - Pi Pico + MAX7219 8x8 LED Matrix

BTN1 (GP11) : cycle die type  →  D4 → D6 → D8 → D10 → D12 → D20 → (loop)
BTN2 (GP15) : roll the die    →  animation then final result

Bitmaps are pre-rotated 90° CW so the module mounts with the
connector on the left and the display reads upright.

Wiring:
MAX7219  VCC -> 3V3
MAX7219  GND -> GND
MAX7219  DIN -> GP3  (SPI0 MOSI)
MAX7219  CLK -> GP2  (SPI0 SCK)
MAX7219  CS -> GP5  (any GPIO)

BTN1 one leg -> GP11,  other leg -> GND  (internal pull-up enabled)
BTN2 one leg -> GP15,  other leg -> GND  (internal pull-up enabled)
"""

import utime
import urandom
from machine import Pin, SPI

# Pin config
SPI_BUS        = 0
SPI_SCK_PIN    = 2
SPI_MOSI_PIN   = 3
CS_PIN         = 5
BTN_SELECT_PIN = 11
BTN_ROLL_PIN   = 15

BRIGHTNESS     = 5 # 0-15
DEBOUNCE_MS    = 50

# MAX7219 registers
REG_DECODEMODE  = 0x09
REG_INTENSITY   = 0x0A
REG_SCANLIMIT   = 0x0B
REG_SHUTDOWN    = 0x0C
REG_DISPLAYTEST = 0x0F

# Low level MAX7219 driver
class MAX7219:
    def __init__(self, spi, cs, brightness=3):
        self.spi = spi
        self.cs  = cs
        self.cs.value(1)

        self._write(REG_SHUTDOWN,    0x01)  # normal operation
        self._write(REG_DISPLAYTEST, 0x00)  # display test off
        self._write(REG_DECODEMODE,  0x00)  # raw bitmap mode
        self._write(REG_SCANLIMIT,   0x07)  # scan all 8 rows
        self.set_brightness(brightness)
        self.clear()

    def _write(self, reg, data):
        self.cs.value(0)
        self.spi.write(bytes([reg, data]))
        self.cs.value(1)

    def set_brightness(self, level):
        self._write(REG_INTENSITY, max(0, min(15, level)))

    def clear(self):
        for row in range(8):
            self._write(0x01 + row, 0x00)

    def show_bitmap(self, bitmap):
        #bitmap: list of 8 ints, one per row, MSB = leftmost pixel
        for row in range(8):
            self._write(0x01 + row, bitmap[row] & 0xFF)


# Die types
DIE_TYPES  = [4, 6, 8, 10, 12, 20]
die_index  = 1 # start on 6

# Animation parameters
ANIM_FRAMES    = 20
ANIM_DELAY_MS  = 55 # initial frame delay (ms)
ANIM_SLOWDOWN  = 11 # ms added per frame - to slow the animation down at the end

"""
Bitmaps

All results 1-20 rendered in a small pixel font inside a rounded dice border
1px gap guaranteed between any lit digit pixel and the border

Layout (before 90° CW rotation):
  Border:  rows 0,7 and cols 0,7
  1px gap: rows 1,6 and cols 1,6 are always off
  Content: rows 2-5, cols 2-4 (single digit, 3x4 font)
           rows 2-5, cols 1-2 (tens, 2x4 font) + cols 4-6 (units, 3x4 font)
All hex values are pre-rotated 90° CW to correct module orientation
"""
RESULT_BITMAPS = {
    1:  [0x7e,0x81,0xa9,0xbd,0xa1,0x81,0x81,0x7e],
    2:  [0x7e,0x81,0xb5,0xb5,0xad,0x81,0x81,0x7e],
    3:  [0x7e,0x81,0xa5,0xad,0xbd,0x81,0x81,0x7e],
    4:  [0x7e,0x81,0x8d,0x89,0xbd,0x81,0x81,0x7e],
    5:  [0x7e,0x81,0xad,0xad,0xb9,0x81,0x81,0x7e],
    6:  [0x7e,0x81,0xbd,0xad,0xb9,0x81,0x81,0x7e],
    7:  [0x7e,0x81,0x85,0xb5,0x8d,0x81,0x81,0x7e],
    8:  [0x7e,0x81,0xbd,0xad,0xbd,0x81,0x81,0x7e],
    9:  [0x7e,0x81,0x8d,0x95,0xbd,0x81,0x81,0x7e],
    10: [0x7e,0xa9,0xbd,0x81,0xbd,0xa5,0xbd,0x7e],
    11: [0x7e,0xa9,0xbd,0x81,0xa9,0xbd,0xa1,0x7e],
    12: [0x7e,0xa9,0xbd,0x81,0xb5,0xb5,0xad,0x7e],
    13: [0x7e,0xa9,0xbd,0x81,0xa5,0xad,0xbd,0x7e],
    14: [0x7e,0xa9,0xbd,0x81,0x8d,0x89,0xbd,0x7e],
    15: [0x7e,0xa9,0xbd,0x81,0xad,0xad,0xb9,0x7e],
    16: [0x7e,0xa9,0xbd,0x81,0xbd,0xad,0xb9,0x7e],
    17: [0x7e,0xa9,0xbd,0x81,0x85,0xb5,0x8d,0x7e],
    18: [0x7e,0xa9,0xbd,0x81,0xbd,0xad,0xbd,0x7e],
    19: [0x7e,0xa9,0xbd,0x81,0x8d,0x95,0xbd,0x7e],
    20: [0x7e,0xb5,0xad,0x81,0xbd,0xa5,0xbd,0x7e],
}

DIE_LABELS = {
    4:  [0x3e,0x22,0x22,0x1c,0x0e,0x08,0x08,0x3e],  # 4
    6:  [0x3e,0x22,0x22,0x1c,0x3e,0x2a,0x2a,0x10],  # 6
    8:  [0x3e,0x22,0x22,0x1c,0x3e,0x2a,0x2a,0x14],  # 8
    10: [0x24,0x3e,0x20,0x00,0x3e,0x22,0x22,0x1c],  # 10
    12: [0x24,0x3e,0x20,0x00,0x3a,0x2a,0x2a,0x24],  # 12
    20: [0x3a,0x2a,0x2a,0x24,0x3e,0x22,0x22,0x1c],  # 20
}

# Splash
SPLASH = [0xc3,0xc3,0x00,0x18,0x18,0x00,0xc3,0xc3]


# Do random roll
def random_roll(sides):
    limit = 256 - (256 % sides)
    while True:
        v = urandom.getrandbits(8)
        if v < limit:
            return (v % sides) + 1


# Roll animation
def roll_animation(display, sides):
    result = random_roll(sides)
    delay  = ANIM_DELAY_MS

    for _ in range(ANIM_FRAMES):
        display.show_bitmap(RESULT_BITMAPS[random_roll(sides)])
        utime.sleep_ms(delay)
        delay += ANIM_SLOWDOWN

    # Short blank flash before the reveal
    display.clear()
    utime.sleep_ms(100)
    display.show_bitmap(RESULT_BITMAPS[result])
    return result


# Main loop
def main():
    global die_index

    spi = SPI(SPI_BUS, baudrate=10_000_000, polarity=0, phase=0, sck=Pin(SPI_SCK_PIN), mosi=Pin(SPI_MOSI_PIN))
    cs = Pin(CS_PIN, Pin.OUT)

    display = MAX7219(spi, cs, brightness=BRIGHTNESS)

    btn_select = Pin(BTN_SELECT_PIN, Pin.IN, Pin.PULL_UP)
    btn_roll = Pin(BTN_ROLL_PIN, Pin.IN, Pin.PULL_UP)

    # Splash screen
    display.show_bitmap(SPLASH)
    utime.sleep_ms(900)
    display.show_bitmap(DIE_LABELS[DIE_TYPES[die_index]])

    last_select = 1
    last_roll = 1
    last_select_time = 0
    last_roll_time = 0

    while True:
        now        = utime.ticks_ms()
        raw_select = btn_select.value()
        raw_roll   = btn_roll.value()

        # BTN1 - cycle die type (falling edge only)
        if raw_select == 0 and last_select == 1:
            if utime.ticks_diff(now, last_select_time) > DEBOUNCE_MS:
                die_index = (die_index + 1) % len(DIE_TYPES)
                display.show_bitmap(DIE_LABELS[DIE_TYPES[die_index]])
                last_select_time = now

        # BTN2 - roll (falling edge only)
        if raw_roll == 0 and last_roll == 1:
            if utime.ticks_diff(now, last_roll_time) > DEBOUNCE_MS:
                roll_animation(display, DIE_TYPES[die_index])
                last_roll_time = now

        last_select = raw_select
        last_roll   = raw_roll
        utime.sleep_ms(10)


main()
The Max7219 Driver
A lightweight class handles all SPI communication with the LED matrix. It initialises the hardware registers on startup and exposes two methods the rest of the code actually uses:
clear() — blanks the display
show_bitmap(bitmap) — takes a list of 8 integers and writes them directly to the display rows
Brightness is set once at startup via the intensity register and can be tuned between 0 and 15.
Random Randomness
Getting a genuinely fair random roll from an 8-bit hardware RNG is trickier than it sounds. Naively using modulo introduces a bias that makes some results slightly more likely than others, not ideal when a D20 roll is on the line.
The fix is rejection sampling: draw a random byte, and if it falls outside the largest multiple of the die’s sides that fits in 8 bits, throw it away and try again. It’s a tiny extra step that guarantees every face has an exactly equal probability.
					def random_roll(sides):
limit = 256 - (256 % sides)
while True:
    v = urandom.getrandbits(8)
    if v < limit:
        return (v % sides) + 1
The Pixel Art
Every result from 1 to 20 has a dedicated bitmap stored as a list of 8 hex values. Single-digit results use a 3×4 pixel font centred in the 8×8 grid. Double-digit results split the available space between a narrower 2×4 tens digit and a 3×4 units digit.
All bitmaps include a rounded outer border with a guaranteed 1-pixel gap between the digit and the edge enough to keep things readable even at the matrix’s native resolution.
They’re also all pre-rotated 90° clockwise in the hex values themselves, so no rotation logic is needed at runtime.
The Roll Animation
The animation runs 20 frames of random results flashing on the display. The delay between frames starts at 55ms and increases by 11ms each frame, giving the illusion of a die decelerating as it comes to rest.
Crucially, the final result is determined before the animation starts so the outcome is always fair, never reverse-engineered from what the display happened to land on last. A 100ms blank flash before the reveal adds a satisfying dramatic pause.
Where We'd Like to Take This Project Next
This project is a great starting point. A few directions worth exploring:
Chain two matrices for a wider display that can show multi-die results side by side.
Add more die types – a D100 or a custom-sided die is just a new entry in the DIE_TYPES list.
3D-print an enclosure – something chunky, dungeon-themed, or shaped like a classic die.
Add a buzzer for a click sound on each roll and a fanfare on a natural 20.
Use a Pico W to log rolls over WiFi to a shared campaign sheet.


