
Build a Remote-Controlled micro:bit Robot | PiShop | micro:bit Move
Building a remote-controlled robot with micro:bit is a fun and educational way to explore coding, electronics, and wireless communication. By using two micro:bits—one as a controller and the other as the robot’s brain—you can easily create a responsive, programmable vehicle that moves at your command. This project is perfect for beginners and makers looking to experiment with radio signals, motor control, and creative robotics. In this guide, we’ll walk you through the process of assembling the robot, programming both micro:bits, and customizing controls to make your own unique remote-controlled bot.
A remote-controlled micro:bit robot is a small, programmable vehicle that uses two micro:bits—one as a wireless controller and the other as the onboard processor—to navigate and perform tasks. By leveraging micro:bit’s built-in sensors and radio functionality, users can create a responsive bot without needing complex wiring or additional modules. This makes it an ideal learning tool for students, hobbyists, and educators looking to introduce robotics in an accessible way. Whether you’re designing a simple obstacle-avoiding rover, a remote-controlled car, or even a robot with interactive features like LED feedback and motion sensing, the possibilities are endless.
What you’ll need:
- 1 x Kitronik :MOVE Motor for the BBC micro:bit
- 1 x micro:bit v2
- 1 x micro:bit GO Kit V2
- 4 x Duracell 1.5V alkaline AA battery – single
- Access to Microsoft makecode.microbit.org
- Worked through the tele-potato radio game
Section 1: Remote Control Sender
Step 1
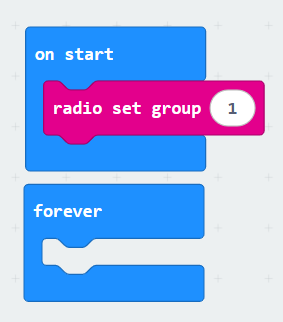
Create the Sender project and place the “on start” & “forever blocks”. Make sure to add a “radio set group” to the “on start block” and set it to 1. The “radio set group” function sets the group ID for sending and receiving messages, like a communication channel. If not set, the program assigns one automatically. micro:bits running the same program will share the same group ID and communicate.
Step 2
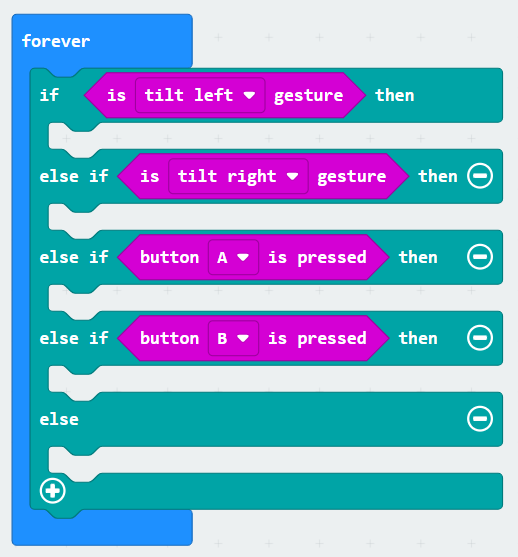
Add an “if-else” block in the forever section and in the logic space showing false, insert input block for gesturing left/right and pressing a/b. The forever block should look like this:
Step 3
Finally, add a 5 “radio send value”, 1 for the stop function and the rest for the directions you’d like the robot to move. Make sure to label them as that as well.
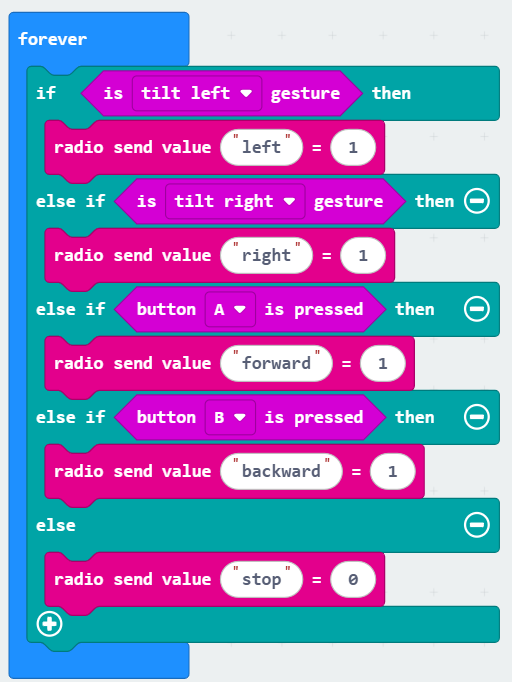
That should tie up the Sender program with a nice little bow! In this section, we learned about connecting the micro:bit to a specific radio channel and sending messages through it. In Section 2, we’ll cover receiving the messages and converting them into the instructions needed to move the robot!
Section 2: Remote Control Receiver
Step 1
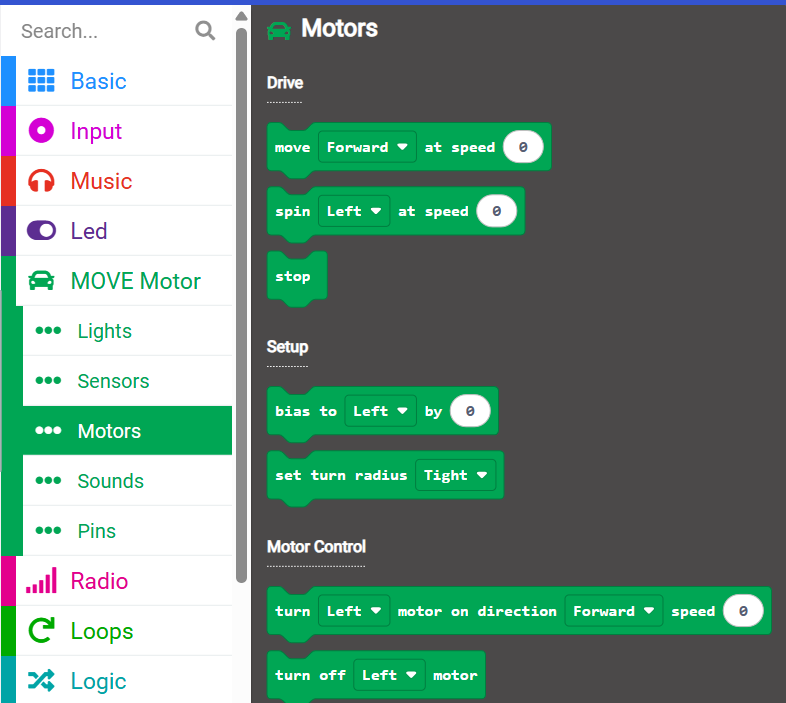
As mentioned above, in this section, we are covering the receiver program. To start off, add the Kitronik move motor extension if you are using the Kitronik :MOVE Motor for the BBC micro:bit. This will give you access to the functions for the motors in the kit.
Step 2
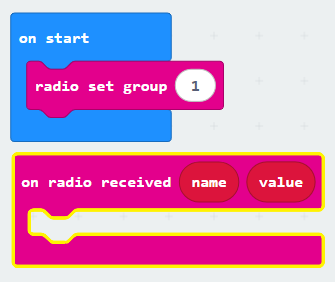
The receiver program is going to look somewhat similar. Starting off with the “on start” & “on radio received” blocks, the “on start” block should have a “radio set group” block set to 1 again.
Step 3
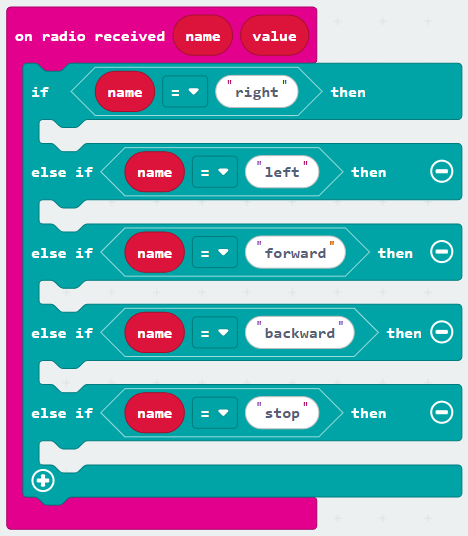
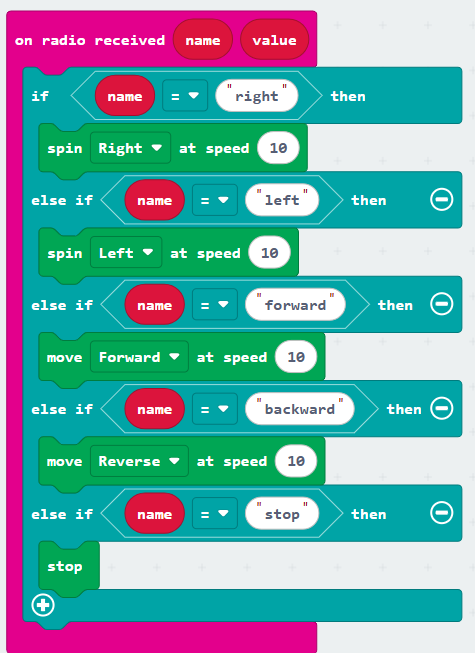
Add an “if-else” block to the “on radio received” block and insert an ” “”equal to”” ” logic block, which will be used for comparing the name function to the string received from the sender program, the strings on the right should be the same as the ones being sent from the sender program. The “on radio received” block should look like this:
Step 4
Finally, add the necessary “move” & “spin” blocks from the MOVE motor section and then download the sender program to the micro:bit Go Kit and the receiver program to the micro:bit Move kit!
Pro Tips and Tricks
Below are some points on how you can ensure the project works and how you can make the project better. Either through switching from radio functions to Bluetooth functionality, there are plenty of ways to can to upgrade your micro:bit based robot!
- Optimize Radio Communication – If multiple micro:bit robots are in the same area, use different radio group IDs to prevent signal interference. Experiment with different numbers to ensure smooth communication.
- Fine-Tune Controls – Adjust gesture sensitivity and button press logic in MakeCode to make your controller more responsive. You can also add a speed control by using different values for movement intensity.
- Power Management – Ensure both micro:bits have fresh batteries, as weak power can cause inconsistent behavior. Consider using rechargeable batteries for extended playtime.
- Expand with Sensors – Enhance your robot by adding micro:bit’s onboard sensors like the accelerometer or light sensor. For example, program the robot to stop moving in low light or react to sudden movements.
- Debugging Made Easy – Use the “show number” or “show string” blocks to display received radio values on the micro:bit LED matrix for troubleshooting connection issues.
- Experiment with Different Motion Patterns – Instead of just forward, backward, left, and right, try programming diagonal movements or even custom patterns like figure eights!
- Add Sound Feedback – Use the micro:bit’s built-in speaker to play tones when certain actions occur, such as a short beep when the robot stops or a different sound for each direction.
- Upgrade to Bluetooth – For a more advanced setup, experiment with Bluetooth communication to control your robot using a smartphone instead of another micro:bit.
Building a remote-controlled robot with micro:bit is a fantastic way to learn about coding, electronics, and wireless communication. In this guide, we covered setting up the sender and receiver micro:bits, programming radio signals, and controlling motors with MakeCode. With just a few components, you can create a fully functional robot and even expand its capabilities with sensors, sound, and custom movement patterns. Now it’s your turn! Try this project yourself, experiment with different controls, and share your creations in the comments.
Looking for more robotics kits or accessories? Check out our store & blog for additional micro:bit add-ons, tutorials, and inspiration to take your projects to the next level!


