
Using Buttons to Get Input
Following up on our previous LED post we will now be adding buttons. Connect your LED the same as last time. Then add a button to your breadboard. From now on we will always connect the negative gutter to GND and the positive gutter to the 5V of the Pi pins. Then add one leg to the negative gutter and the other to one of your Pi pins (eg. GPIO9)
Hardware
- 830 Point Solderless Breadboard
- Breadboard Jumper Cable
- 5mm diffused LED
- Tactile Switch 12×12 4.3mm 12V
- Raspberry Pi
- SD card with Raspberry Pi OS
- Keyboard and mouse
- Screen or Monitor or even a TV
If you need any help setting you your Raspberry Pi please head over to our setup guide, we will assume that you have already done so in this post.
Wiring
Push buttons have “legs” that go through the button. Therefore one side is “Positive” and one side is “Negative”, but since you are simply using it to close the circuit, it does not really matter which one is on which side.
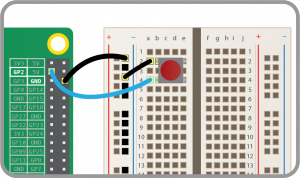
You will connect one leg to a ground pin of the Pi (GND)
The other leg you will connect to one of the General pins on the Pi (like in this example we have it on GPIO 2)
In your python IDLE type in the following code:
from gpiozero import Button

button = Button(2)

button.wait_for_press()
print('You pushed me')
If you press the button your text will appear… And if you change your python text to the following, when you push the button the LED will light up:
from gpiozero import LED, Button
from time import sleep
led = LED(10)
button = Button(9)

button.wait_for_press()
led.on()
sleep(3)
led.off()
Making a switch
With a switch, a single press and release on the button would turn the LED on, and another press and release would turn it off again.
Modify your code so that it looks like this:
from gpiozero import LED, Button
from time import sleep

led = LED(10)
button = Button(9)
while True:
    button.wait_for_press()
    led.toggle()
    sleep(0.5)
‘led.toggle()’ switches the state of the LED from on to off, or off to on. Since this happens in a loop the LED will turn on and off each time the button is pressed.
It would be great if you could make the LED switch on only when the button is being held down. With GPIO Zero, that’s easy. There are two methods of the Button class called ‘when_pressed’ and ‘when_released’. These don’t block the flow of the program, so if they are placed in a loop, the program will continue to cycle indefinitely.
Modify your code to look like this:
from gpiozero import LED, Button
from signal import pause

led = LED(10)

button = Button(9)
button.when_pressed = led.on
button.when_released = led.off
pause()
Save and run the program. Now when the button is pressed, the LED will light up. It will turn off again when the button is released.
Refer to our post on LEDs and Breadboards for some more tips or reach out to us on [email protected].
For the full guide and further resources checkout the Raspberry Pi Foundations project


